前端(vue)入门到精通课程:进入学习
Node是一个基于Chrome V8引擎的JavaScript运行环境,通常用于创建网络应用程序。它可以同时处理多个连接,并且不像其他大多数模型那样依赖线程。
对于 Web 开发者来说,从数据库或Web服务器获取数据,然后输出到Excel文件以进行进一步分析的场景时有发生。我们的技术团队在跟国内外各行各业用户交流的过程中,就曾发现有很多的用户尝试在Node.js的环境下运行SpreadJS 纯前端表格控件,借助该控件,可以在服务器不预装任何Excel依赖项的情况下,收集用户输入的信息,并将其自动导出到Excel文件中。
为了满足广大技术爱好者的需要,同时减少大家在未来技术选型方面所走的弯路,本文将就SpreadJS 与 Node.js之间的技术性方案进行探讨!
一、安装 SpreadJS 和 Node .js
首先,我们需要安装Node.js以及Mock-Browser,BufferJS和FileReader,大家可以前往以下链接进行下载,同步操作:
- Installing Node.js viaPackage Manager
- Mock-Browser
- BufferJS
- FileReader
我们将使用Visual Studio创建应用程序。打开Visual Studio后,使用JavaScript> Node.js>Blank Node.js控制台应用程序模板创建一个新应用程序。这将自动创建所需的文件并打开" app.js"文件,也是我们将要更改的唯一文件。
对于BufferJS库,您需要下载该软件包,然后通过导航到项目文件夹(一旦创建)并运行以下命令,将其手动安装到项目中:
npm install
安装完成后,您可能需要打开项目的package.json文件并将其添加到" dependencies"部分。文件内容应如下所示:
{ "name": "spread-sheets-node-jsapp", "version": "0.0.0", "description": "SpreadSheetsNodeJSApp", "main": "app.js", "author": { "name": "admin" }, "dependencies": { "FileReader": "^0.10.2", "bufferjs": "1.0.0", "mock-browser": "^0.92.14" } }
在此示例中,我们将使用Node.js的文件系统模块。我们可以将其加载到:
var fs = require('fs')
为了将SpreadJS与Node.js结合使用,我们还需要加载已安装的Mock-Browser:
var mockBrowser =require('mock-browser').mocks.MockBrowser
在加载SpreadJS脚本之前,我们需要初始化模拟浏览器。初始化我们稍后在应用程序中可能需要使用的变量,尤其是" window"变量:
global.window =mockBrowser.createWindow() global.document = window.document global.navigator = window.navigator global.HTMLCollection =window.HTMLCollection global.getComputedStyle =window.getComputedStyle
初始化FileReader库:
var fileReader = require('filereader'); global.FileReader = fileReader;
二、使用SpreadJS npm 包
将SpreadJS安装文件中的SpreadJS Sheets和ExcelIO包添加到项目中。
您可以通过右键单击解决方案资源管理器的" npm"部分并将它们添加到您的项目中,然后选择"安装新的NPM软件包"。您应该能够搜索" GrapeCity"并安装以下2个软件包:
@grapecity/spread-sheets @grapectiy/spread-excelio
将SpreadJS npm软件包添加到项目后,正确的依赖关系将被写入package.json:
{ "name": "spread-sheets-node-jsapp", "version": "0.0.0", "description": "SpreadSheetsNodeJSApp", "main": "app.js", "author": { "name": "admin" }, "dependencies":{ "@grapecity/spread-excelio": "^11.2.1", "@grapecity/spread-sheets": "^11.2.1", "FileReader": "^0.10.2", "bufferjs": "1.0.0", "mock-browser": "^0.92.14" } }
现在我们需要在app.js文件中引入它:
var GC =require('@grapecity/spread-sheets') var GCExcel =require('@grapecity/spread-excelio');
使用npm软件包时,还需要设置许可证密钥(点击此处,免费申请许可证密钥):
GC.Spread.Sheets.LicenseKey ="<YOUR KEY HERE>"
在这个特定的应用程序中,我们将向用户显示他们正在使用哪个版本的SpreadJS。为此,我们可以引入package.json文件,然后引用依赖项以获取版本号:
var packageJson =require('./package.json') console.log('n** Using Spreadjs Version"' + packageJson.dependencies["@grapecity/spread-sheets"] +'" **')
三、将 Excel 文件加载到您的 Node.js 应用程序中
点击此处,下载现成的Excel模板文件,该文件包含了从用户那里获取数据。接下来,将数据放入文件中并导出。在这种情况下,文件是用户可以编辑的状态。
初始化工作簿和ExcelIO变量:
var wb = new GC.Spread.Sheets.Workbook(); var excelIO = new GCExcel.IO();
我们在读取文件时将代码包装在try / catch块中。然后,初始化变量" readline",让您读取用户输入到控制台的数据。接下来,我们将其存储到一个JavaScript数组中,以便轻松填写Excel文件:
// Instantiate the spreadsheet and modifyit console.log('nManipulatingSpreadsheetn---'); try { var file = fs.readFileSync('./content/billingInvoiceTemplate.xlsx'); excelIO.open(file.buffer, (data) => { wb.fromJSON(data); const readline = require('readline'); var invoice = { generalInfo: [], invoiceItems: [], companyDetails: [] }; }); } catch (e) { console.error("** Error manipulating spreadsheet **"); console.error(e); }
四、收集用户输入信息

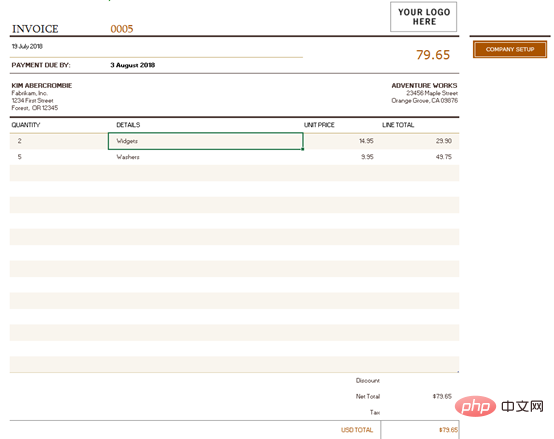
上图显示了我们正在使用的Excel文件。我们可以在excelio.open调用中创建一个单独的函数,以在控制台中提示用户需要的每一项内容。我们也可以创建一个单独的数组,将数据保存到每个输入后,然后将其推送到我们创建的invoice.generalInfo数组中:
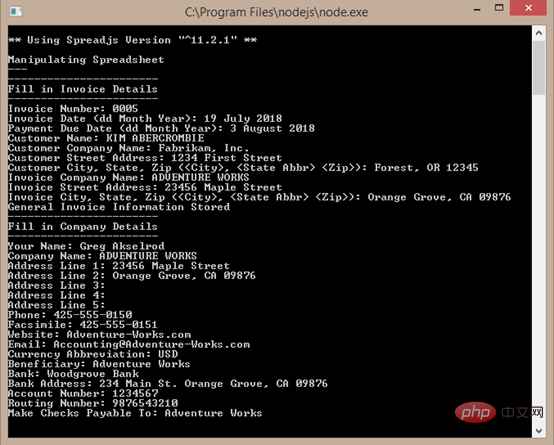
fillGeneralInformation(); function fillGeneralInformation() { console.log("-----------------------nFill in InvoiceDetailsn-----------------------") const rl = readline.createInterface({ input: process.stdin, output: process.stdout }); var generalInfoArray = []; rl.question('Invoice Number: ', (answer) => { generalInfoArray.push(answer); rl.question('Invoice Date (dd Month Year): ', (answer) => { generalInfoArray.push(answer); rl.question('Payment Due Date (ddMonth Year): ', (answer) => { generalInfoArray.push(answer); rl.question('Customer Name: ',(answer) => { generalInfoArray.push(answer); rl.question('CustomerCompany Name: ', (answer) => { generalInfoArray.push(answer); rl.question('Customer Street Address:', (answer) => { generalInfoArray.push(answer); rl.question('Customer City, State, Zip (<City>, <State Abbr><Zip>): ', (answer) => { generalInfoArray.push(answer); rl.question('Invoice Company Name: ', (answer) => { generalInfoArray.push(answer); rl.question('Invoice Street Address: ', (answer) => { generalInfoArray.push(answer); rl.question('Invoice City, State, Zip (<City>, <State Abbr><Zip>): ', (answer) => { generalInfoArray.push(answer); rl.close(); invoice.generalInfo.push({ "invoiceNumber": generalInfoArray[0], "invoiceDate": generalInfoArray[1], "paymentDueDate": generalInfoArray[2], "customerName": generalInfoArray[3], "customerCompanyName": generalInfoArray[4], "customerStreetAddress": generalInfoArray[5], "customerCityStateZip": generalInfoArray[6], "invoiceCompanyName": generalInfoArray[7], "invoiceStreetAddress": generalInfoArray[8], "invoiceCityStateZip": generalInfoArray[9], }); console.log("General Invoice Information Stored"); fillCompanyDetails(); }); }); }); }); }); }); }); }); }); }); }
该函数被称为" fillCompanyDetails",目的是收集有关公司的信息以填充到工作簿的第二张表中:
function fillCompanyDetails() { console.log("-----------------------nFill in CompanyDetailsn-----------------------") const rl = readline.createInterface({ input: process.stdin, output: process.stdout }); var companyDetailsArray = [] rl.question('Your Name: ', (answer) => { companyDetailsArray.push(answer); rl.question('Company Name: ', (answer) => { companyDetailsArray.push(answer); rl.question('Address Line 1: ',(answer) => { companyDetailsArray.push(answer); rl.question('Address Line 2: ',(answer) => { companyDetailsArray.push(answer); rl.question('Address Line3: ', (answer) => { companyDetailsArray.push(answer); rl.question('AddressLine 4: ', (answer) => { companyDetailsArray.push(answer); rl.question('Address Line 5: ', (answer) => { companyDetailsArray.push(answer); rl.question('Phone: ', (answer) => { companyDetailsArray.push(answer); rl.question('Facsimile: ', (answer) => { companyDetailsArray.push(answer); rl.question('Website: ', (answer)=> { companyDetailsArray.push(answer); rl.question('Email: ', (answer) => { companyDetailsArray.push(answer); rl.question('Currency Abbreviation: ', (answer) => { companyDetailsArray.push(answer); rl.question('Beneficiary: ',(answer) => { companyDetailsArray.push(answer); rl.question('Bank: ', (answer) => { companyDetailsArray.push(answer); rl.question('Bank Address: ', (answer) => { companyDetailsArray.push(answer); rl.question('Account Number: ', (answer) => { companyDetailsArray.push(answer); rl.question('RoutingNumber: ', (answer) => { companyDetailsArray.push(answer); rl.question('Make Checks Payable To: ', (answer) => { companyDetailsArray.push(answer); rl.close(); invoice.companyDetails.push({ "yourName": companyDetailsArray[0], "companyName": companyDetailsArray[1], "addressLine1": companyDetailsArray[2], "addressLine2": companyDetailsArray[3], "addressLine3": companyDetailsArray[4], "addressLine4": companyDetailsArray[5], "addressLine5": companyDetailsArray[6], "phone":companyDetailsArray[7], "facsimile": companyDetailsArray[8], "website":companyDetailsArray[9], "email": companyDetailsArray[10], "currencyAbbreviation":companyDetailsArray[11], "beneficiary": companyDetailsArray[12], "bank":companyDetailsArray[13], "bankAddress": companyDetailsArray[14], "accountNumber": companyDetailsArray[15], "routingNumber": companyDetailsArray[16], "payableTo": companyDetailsArray[17] }); console.log("Invoice Company Information Stored"); console.log("-----------------------nFillin Invoice Itemsn-----------------------") fillInvoiceItemsInformation(); }); }); }); }); }); }); }); }); }); }); }); }); }); }); }); }); }); }); }

现在我们已经有了用户的基本信息,我们可以集中精力收集单个项目,并另命名为" fillInvoiceItemsInformation"函数。在每个项目执行之前,我们会询问用户是否要添加一个项目。如果他们继续输入" y",那么我们将收集该项目的信息,然后再次询问直到他们键入" n":
function fillInvoiceItemsInformation() { const rl = readline.createInterface({ input: process.stdin, output: process.stdout }); var invoiceItemArray = []; rl.question('Add item?(y/n): ', (answer) => { switch (answer) { case "y": console.log("-----------------------nEnter ItemInformationn-----------------------"); rl.question('Quantity: ',(answer) => { invoiceItemArray.push(answer); rl.question('Details: ',(answer) => { invoiceItemArray.push(answer); rl.question('UnitPrice: ', (answer) => { invoiceItemArray.push(answer); invoice.invoiceItems.push({ "quantity":invoiceItemArray[0], "details": invoiceItemArray[1], "unitPrice": invoiceItemArray[2] }); console.log("ItemInformation Added"); rl.close(); fillInvoiceItemsInformation(); }); }); }); break; case "n": rl.close(); return fillExcelFile(); break; default: console.log("Incorrectoption, Please enter 'y' or 'n'."); } }); }
五、填入您的Excel 文件
在收集所有必需的用户信息后,我们可以将其填入到Excel文件中:
function fillExcelFile() { console.log("-----------------------nFilling in Excelfilen-----------------------"); fillBillingInfo(); fillCompanySetup(); } function fillBillingInfo() { var sheet = wb.getSheet(0); sheet.getCell(0, 2).value(invoice.generalInfo[0].invoiceNumber); sheet.getCell(1, 1).value(invoice.generalInfo[0].invoiceDate); sheet.getCell(2, 2).value(invoice.generalInfo[0].paymentDueDate); sheet.getCell(3, 1).value(invoice.generalInfo[0].customerName); sheet.getCell(4, 1).value(invoice.generalInfo[0].customerCompanyName); sheet.getCell(5, 1).value(invoice.generalInfo[0].customerStreetAddress); sheet.getCell(6, 1).value(invoice.generalInfo[0].customerCityStateZip); sheet.getCell(3, 3).value(invoice.generalInfo[0].invoiceCompanyName); sheet.getCell(4, 3).value(invoice.generalInfo[0].invoiceStreetAddress); sheet.getCell(5, 3).value(invoice.generalInfo[0].invoiceCityStateZip); } function fillCompanySetup() { var sheet = wb.getSheet(1); sheet.getCell(2, 2).value(invoice.companyDetails[0].yourName); sheet.getCell(3, 2).value(invoice.companyDetails[0].companyName); sheet.getCell(4, 2).value(invoice.companyDetails[0].addressLine1); sheet.getCell(5, 2).value(invoice.companyDetails[0].addressLine2); sheet.getCell(6, 2).value(invoice.companyDetails[0].addressLine3); sheet.getCell(7, 2).value(invoice.companyDetails[0].addressLine4); sheet.getCell(8, 2).value(invoice.companyDetails[0].addressLine5); sheet.getCell(9, 2).value(invoice.companyDetails[0].phone); sheet.getCell(10, 2).value(invoice.companyDetails[0].facsimile); sheet.getCell(11, 2).value(invoice.companyDetails[0].website); sheet.getCell(12, 2).value(invoice.companyDetails[0].email); sheet.getCell(13, 2).value(invoice.companyDetails[0].currencyAbbreviation); sheet.getCell(14, 2).value(invoice.companyDetails[0].beneficiary); sheet.getCell(15, 2).value(invoice.companyDetails[0].bank); sheet.getCell(16, 2).value(invoice.companyDetails[0].bankAddress); sheet.getCell(17, 2).value(invoice.companyDetails[0].accountNumber); sheet.getCell(18, 2).value(invoice.companyDetails[0].routingNumber); sheet.getCell(19, 2).value(invoice.companyDetails[0].payableTo); }
为了防止用户添加的数量超过工作表最大行数,我们可以在工作表中自动添加
 站长资讯网
站长资讯网