
【相关学习推荐:python教程】
文章目录
- 前言
- Github
- 效果
- 实现过程
- 整体代码
前言
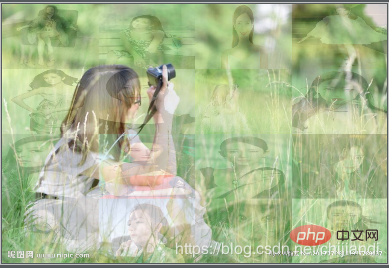
看电影的时候发现一个照片墙的功能,觉得这样生成照片挺好玩的,于是就动手用Python做了一下,觉得用来作照片纪念的效果可能会不错。
P:后面了解到我想做的功能叫蒙太奇拼图,所以这篇博客记录先留着,闲下来会去看一下蒙太奇拼图的算法
Github
https://github.com/jiandi1027/photo.git
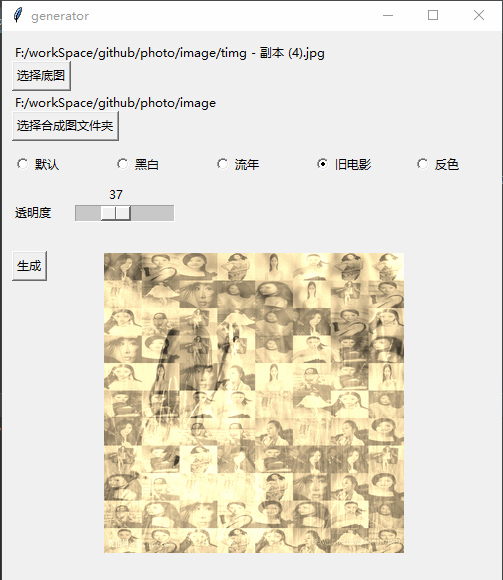
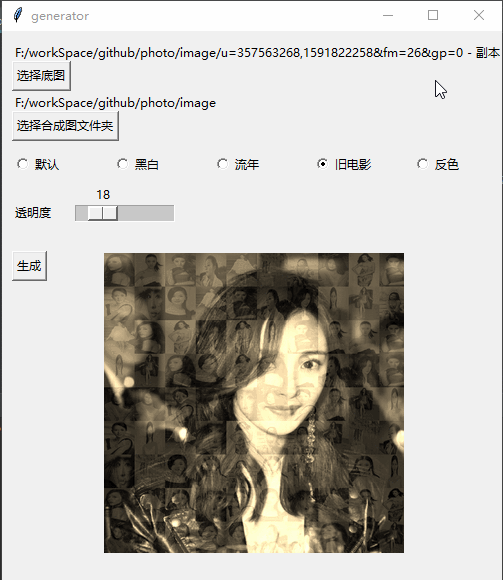
效果
实现过程
1.获取图片文件夹的图片个数N,将底图拆分成XY块区域,且使X * Y<N
(为了保证整体的协调,会舍弃几张图片,比如5张时可能只取22的4张图片)
# 打开图片 base = Image.open(baseImgPath) base = base.convert('RGBA') # 获取图片文件夹图片并打乱顺序 files = glob.glob(imagesPath + '/*.*') random.shuffle(files) # 图片数量 num = len(files) # 底图大小 x = base.size[0] y = base.size[1] # 每张图片数量 这个公式是为了xNum * yNum 的总图片数量<num又成比例的最大整数 yNum = int((num / (y / x)) ** 0.5) if yNum == 0: yNum = 1 xNum = int(num / yNum) # 图片大小 因为像素没有小数点 为防止黑边所以+1 xSize = int(x / xNum) + 1 ySize = int(y / yNum) + 1

2.遍历文件夹的图片,依次填充生成最终合成图
for file in files: fromImage = Image.open(file) i = int(num % xNum) j = int(num / xNum) out = fromImage.resize((xSize, ySize), Image.ANTIALIAS).convert('RGBA') toImage.paste(out, (i * xSize, j * ySize)) toImage = toImage.convert('RGBA') img = Image.blend(base, toImage, 0.3) # 显示图片 photo = ImageTk.PhotoImage(img) showLabel.config(image=photo) showLabel.image = photo if num < xNum * yNum: num = num + 1
3.生成结束后保存图片
toImage.save(‘generator.png’)
img.save(“final.png”)
4.建立可视化界面
5.Pyinstaller生成exe可执行文件
安装pyinstaller模块,执行命令生成exe文件
pyinstaller -F -w test.py (-w就是取消窗口)
整体代码
Python的语法和设计规范还没学过,所以代码规范代码复用之类的可能会有点不到位,本博文主要是一个思路与整体流程的记录。
后续又优化了一下一些特效,比如合成图片采用随机位置,增加黑白,流年等显示特效,透明度自选等。
import PIL.Image as Image import glob import random import tkinter.filedialog from tkinter.filedialog import askdirectory, Label, Button, Radiobutton, Entry import threading import numpy as np from PIL import ImageTk alpha = 0.3 imagesPath = '' # 滑动条回调 修改透明度 def resize(ev=None): global alpha alpha = scale.get() / 100 # 黑白 def blackWithe(image): # r,g,b = r*0.299+g*0.587+b*0.114 im = np.asarray(image.convert('RGB')) trans = np.array([[0.299, 0.587, 0.114], [0.299, 0.587, 0.114], [0.299, 0.587, 0.114]]).transpose() im = np.dot(im, trans) return Image.fromarray(np.array(im).astype('uint8')) # 流年 def fleeting(image, params=12): im = np.asarray(image.convert('RGB')) im1 = np.sqrt(im * [1.0, 0.0, 0.0]) * params im2 = im * [0.0, 1.0, 1.0] im = im1 + im2 return Image.fromarray(np.array(im).astype('uint8')) # 旧电影 def oldFilm(image): im = np.asarray(image.convert('RGB')) # r=r*0.393+g*0.769+b*0.189 g=r*0.349+g*0.686+b*0.168 b=r*0.272+g*0.534b*0.131 trans = np.array([[0.393, 0.769, 0.189], [0.349, 0.686, 0.168], [0.272, 0.534, 0.131]]).transpose() # clip 超过255的颜色置为255 im = np.dot(im, trans).clip(max=255) return Image.fromarray(np.array(im).astype('uint8')) # 反色 def reverse(image): im = 255 - np.asarray(image.convert('RGB')) return Image.fromarray(np.array(im).astype('uint8')) def chooseBaseImagePath(): name = tkinter.filedialog.askopenfilename() if name != '': global baseImgPath baseImgPath = name baseImageLabel.config(text=name) baseImg = Image.open(baseImgPath) widthEntry.delete(0, tkinter.END) heightEntry.delete(0, tkinter.END) widthEntry.insert(0, baseImg.size[0]) heightEntry.insert(0, baseImg.size[1]) else: baseImageLabel.config(text="您没有选择任何文件") def chooseImagesPath(): name = askdirectory() if name != '': global imagesPath imagesPath = name ImagesLabel.config(text=name) else: ImagesLabel.config(text="您没有选择任何文件") def thread_it(func, *args): # 创建 t = threading.Thread(target=func, args=args) # 守护 !!! t.setDaemon(True) # 启动 t.start() def test(): MyThread(1, "Thread-1", 1).start() baseImgPath = '' def generator(): baseImg = Image.open(baseImgPath) baseImg = baseImg.convert('RGBA') files = glob.glob(imagesPath + '/*.*') # 获取图片 random.shuffle(files) num = len(files) # 模板图片大小 x = baseImg.size[0] y = baseImg.size[1] # 每张图片数量 这个公式是为了xNum * yNum 的总图片数量<num又成比例的最大整数 yNum = int((num / (y / x)) ** 0.5) if yNum == 0: yNum = 1 xNum = int(num / yNum) # 图片大小 因为像素没有小数点 为防止黑边所以+1 xSize = int(x / xNum) + 1 ySize = int(y / yNum) + 1 # 生成数量的随机列表 用于随机位置合成图片 l = [n for n in range(0, xNum * yNum)] random.shuffle(l) toImage = Image.new('RGB', (x, y)) num = 1 for file in files: if num <= xNum * yNum: num = num + 1 else: break fromImage = Image.open(file) temp = l.pop() i = int(temp % xNum) j = int(temp / xNum) out = fromImage.resize((xSize, ySize), Image.ANTIALIAS).convert('RGBA') toImage.paste(out, (i * xSize, j * ySize)) toImage = toImage.convert('RGBA') img = Image.blend(baseImg, toImage, alpha) # 特效 但是会读取像素会降低效率 choose = v.get() if choose == 1: img = blackWithe(img) elif choose == 2: img = fleeting(img) elif choose == 3: img = oldFilm(img) elif choose == 4: img = reverse(img) resize = img.resize((300, 300), Image.ANTIALIAS).convert('RGBA') # 显示图片 photo = ImageTk.PhotoImage(resize) showLabel.config(image=photo) showLabel.image = photo toImage.save('generator.png') img = img.resize((int(widthEntry.get()),int(heightEntry.get())), Image.ANTIALIAS).convert('RGBA') img.save("final.png") resize.save("resize.png") class MyThread(threading.Thread): # 继承父类threading.Thread def __init__(self, threadID, name, counter): threading.Thread.__init__(self) self.threadID = threadID self.name = name self.counter = counter def run(self): # 把要执行的代码写到run函数里面 线程在创建后会直接运行run函数 generator() root = tkinter.Tk() root.title('generator') root.geometry('500x550') baseImageLabel = Label(root, text='') baseImageLabel.place(x=10, y=10) baseImageBtn = Button(root, text="选择底图", command=chooseBaseImagePath).place(x=10, y=30) ImagesLabel = Label(root, text='') ImagesLabel.place(x=10, y=60) ImagesBtn = Button(root, text="选择合成图文件夹", command=chooseImagesPath).place(x=10, y=80) v = tkinter.IntVar() v.set(0) Radiobutton(root, variable=v, text='默认', value=0, ).place(x=10, y=120) Radiobutton(root, variable=v, text='黑白', value=1, ).place(x=110, y=120) Radiobutton(root, variable=v, text='流年', value=2, ).place(x=210, y=120) Radiobutton(root, variable=v, text='旧电影', value=3, ).place(x=310, y=120) Radiobutton(root, variable=v, text='反色', value=4, ).place(x=410, y=120) scaleLabel = Label(root, text='透明度').place(x=10, y=170) scale = tkinter.Scale(root, from_=0, to=100, orient=tkinter.HORIZONTAL, command=resize) scale.set(30) # 设置初始值 scale.pack(fill=tkinter.X, expand=1) scale.place(x=70, y=150) Label(root, text='宽(像素)').place(x=180, y=170) widthEntry = Entry(root, bd=1) widthEntry.place(x=230, y=173, width=100) Label(root, text='高(像素)').place(x=320, y=170) heightEntry = Entry(root, bd=1) heightEntry.place(x=370, y=173, width=100) generatorBtn = Button(root, text="生成", command=test).place(x=10, y=220) showLabel = Label(root) showLabel.place(x=100, y=220) root.mainloop()
想了解
